How to Print Continuous Labels in Word
We can use MS Excel for various purposes. Moreover, you can work with MS Excel and MS Word simultaneously. This is a very powerful and beneficial feature for all the users of MS Office apps. This is because sometimes we have to link the data present in the Word files and the Excel worksheets. Again, a lot of people store many important Labels in Excel. Labels are essential when sending emails to our desired recipients. In this article, we'll show you the step-by-step procedures to Mail Merge Labels from Excel to Word.
Download Practice Workbook
Download the following workbook to practice by yourself.
Step by Step Procedures to Mail Merge Labels from Excel to Word
MS Word has a cool feature called Mail Merge. Using this feature, we can carry out numerous operations. You can import the necessary labels from Excel to Word by applying this Mail Merge. This article will guide you through the required steps to Mail Merge Labels from Excel. Therefore, follow the steps below carefully to perform the task.
STEP 1: Prepare Excel File for Mail Merge
- First of all, open an Excel workbook.
- Then, input the necessary fields to create the Label.
- In this example, we insert the First Name, Last Name, Position, and Company.
- In this way, prepare the Excel file for Mail Merge.

STEP 2: Insert Mail Merge Document in Word
Now, we have to set up the Word for merging the Excel file to insert the Mail Merge Document. So, learn the process below.
- Firstly, open a Word window.
- Now, go to the Mailings tab.
- Next, select Step-by-Step Mail Merge Wizard from the Start Mail Merge drop-down.
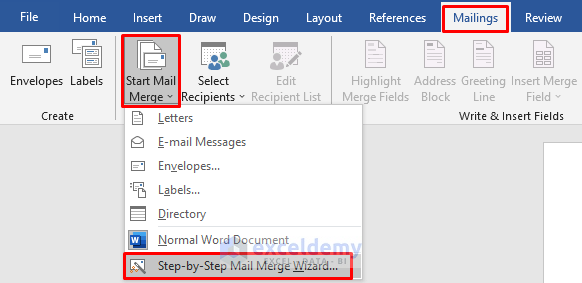
- As a result, the Mail Merge pane will appear on the right side of the Word window.
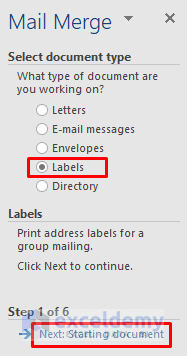
- Subsequently, choose Labels from Select document type.
- Afterward, click Next: Starting document.
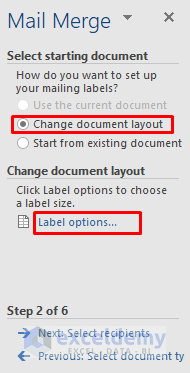
- Consequently, Step 2 of the Mail Merge will emerge.
- Here, check the circle for Use the current document.
- But, if that option is inactive, choose Change document layout.
- Then, press Label options.
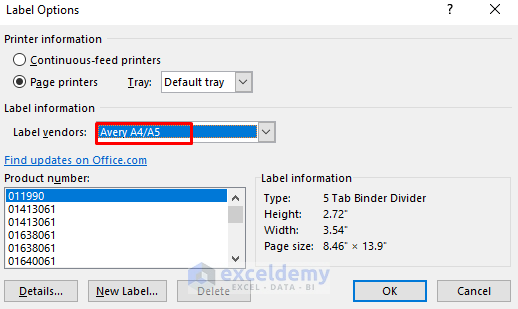
- Thus, the Label Options dialog box will pop out.
- There, choose your desired settings and press OK.
- Finally, press Next: Select recipients.

Read More: How to Create Labels in Word from Excel List (Step-by-Step Guideline)
STEP 3: Link Word and Excel for Merging Mail Labels
However, we need to link the Excel file to Word. To do that, follow the process.
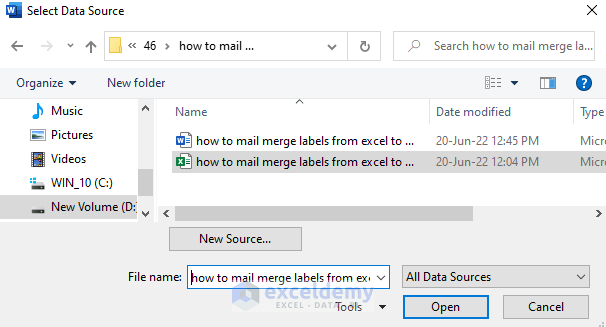
- First, click Use an existing list from Select recipients.
- Next, press Browse.

- As a result, the Select Data Source dialog box will appear.
- Choose the desired Excel file and press Open.
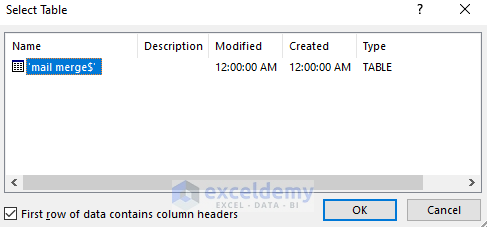
- Consequently, the Select Table box will pop out.
- Lastly, click the table and press OK.
Read More: How to Convert Excel to Word Labels (With Easy Steps)
STEP 4: Select Recipients
After STEP 3, it'll return the Mail Merge Recipients window.
- You can exclude any particular field by unchecking the box beside them.
- Click the drop-down icon beside the column headers to apply the Filter feature or perform the Sort operation.
- After making necessary changes, press OK.

- Subsequently, go to the next step.

STEP 5: Edit Address Labels
Additionally, we'll organize the Address block to make changes to the Label.
- Select the Address block in the Mail Merge pane at first.
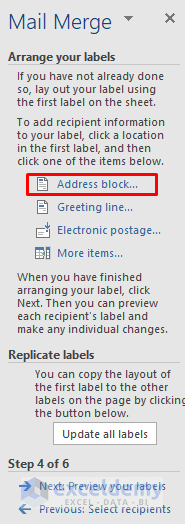
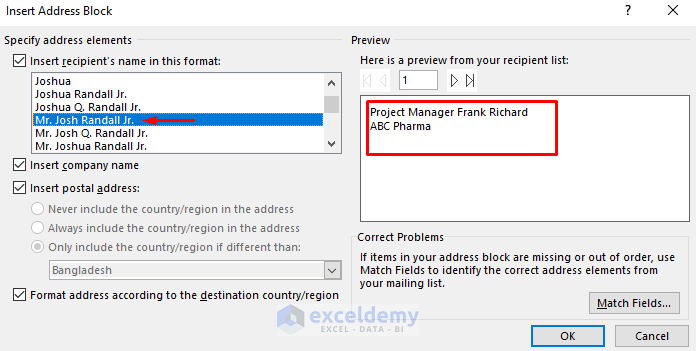
- Hence, the Insert Address Block dialog box will emerge.
- Furthermore, choose your desired format. Look at the Preview section to check the required output.
- Afterward, press OK.
Read More: How to Print Address Labels in Excel (2 Quick Ways)
STEP 6: Display Mail Merge Labels
- In the Preview your labels step, you'll get to see the preview of the labels.
- Choose the desired Recipient from the Mail Merge pane and the result will appear in the Word file.
- See the following picture to have a better understanding.

Read More: How to Print Labels in Excel (With Easy Steps)
STEP 7: Print Mailing Label
If you want to print the Mailing Labels, follow the process below.
- After you go to the Complete the merge step, you'll get a Print option.
- Press Print.

- As a result, the Merge to Printer dialog box will pop out.
- Choose your desired setup and press OK.

STEP 8: Save Mailing Labels for Future Use
At last, we need to Save the Mailing Labels in the Word file for future uses. Therefore, see the process to complete the task.
- Press the Ctrl and S keys at the same time to save the file.
- In this manner, it'll save the file.
- Now, if you update the linked Excel file, it'll also update the Labels in Word automatically.
- Whenever you open the Word file from now on, you'll get a warning dialog box as below in the below figure.
- So, click Yes to Mail Merge Labels from Excel to Word. Click No otherwise.

Conclusion
Henceforth, you will be able to Mail Merge Labels from Excel to Word following the above-described procedures. Keep using them and let us know if you have more ways to do the task. Follow the ExcelDemy website for more articles like this. Don't forget to drop comments, suggestions, or queries if you have any in the comment section below.
Related Articles
- How to Merge Excel File to Mailing Labels (With Easy Steps)
- How to Print Avery Labels from Excel (2 Simple Methods)
- How to Create Labels Without Word in Excel (Step-by-Step Guide)
Source: https://www.exceldemy.com/mail-merge-labels-from-excel-to-word/
0 Response to "How to Print Continuous Labels in Word"
Post a Comment